Read more: http://mrbool.com/how-to-create-a-sign-up-form-registration-with-php-and-mysql/28675#ixzz47rznG0YC
Much of the websites have a registration form for your users to sign up and thus may benefit from some kind of privilege within the site. In this article we will see how to create a registration form in PHP and MySQL.
We will use simple tags and also we will use table tag to design the Sign-Up.html webpage. Let’s start:
Listing 1: sign-up.html
<!DOCTYPE HTML>
<html>
<head>
<title>Sign-Up</title>
</head>
<body id="body-color">
<div id="Sign-Up">
<fieldset style="width:30%"><legend>Registration Form</legend>
<table border="0">
<tr>
<form method="POST" action="connectivity-sign-up.php">
<td>Name</td><td> <input type="text" name="name"></td>
</tr>
<tr>
<td>Email</td><td> <input type="text" name="email"></td>
</tr>
<tr>
<td>UserName</td><td> <input type="text" name="user"></td>
</tr>
<tr>
<td>Password</td><td> <input type="password" name="pass"></td>
</tr>
<tr>
<td>Confirm Password </td><td><input type="password" name="cpass"></td>
</tr>
<tr>
<td><input id="button" type="submit" name="submit" value="Sign-Up"></td>
</tr>
</form>
</table>
</fieldset>
</div>
</body>
</html>
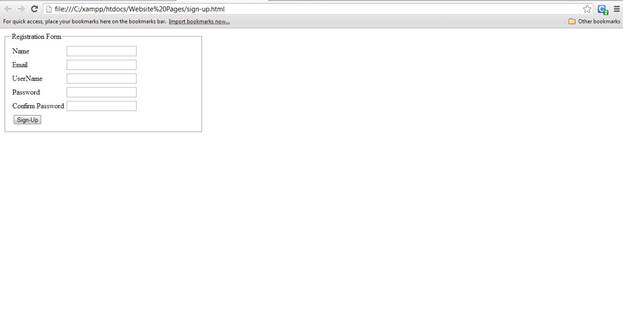
Figure 1: Output of sing-up.html webpage is looking simple without CSS styles
Description of sing-in.html webpage:
As you can see the Figure 1, there is a Registration form and it is asking few data about user. These are the common data which ask by any website from his users or visitors to create and ID and Password. We used table tag because to show the form fields on the webpage in a arrange form as you can see them on Figure 1. It’s looking so simple because we yet didn’t used CSS Style on it now let’s we use CSS styles and link the CSS style file with sing-up.html webpage.
Listing 2: style.css
/*CSS File For Sign-Up webpage*/
#body-color{
background-color:#6699CC;
}
#Sign-Up{
background-image:url('sign-up.png');
background-size:500px 500px;
background-repeat:no-repeat;
background-attachment:fixed;
background-position:center;
margin-top:150px;
margin-bottom:150px;
margin-right:150px;
margin-left:450px;
padding:9px 35px;
}
#button{
border-radius:10px;
width:100px;
height:40px;
background:#FF00FF;
font-weight:bold;
font-size:20px;
}
Listing 3: Link style.css with sign-up.html webpage
<link rel="stylesheet" type="text/css" href="style.css">
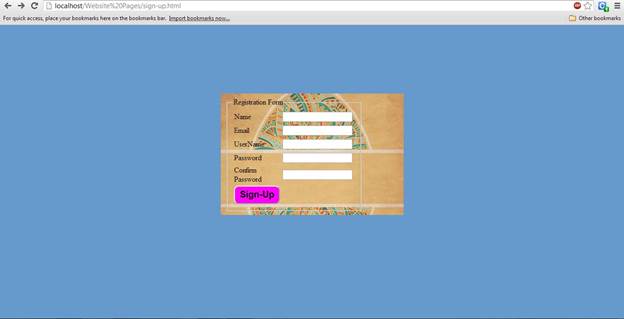
Figure 2: output of sing-in.html webpage with style.css
Description of style.css file:
In the external CSS file we used some styles which could be look new for you. As we used an image in the background and set it in the center of the webpage. Which is become easy to use by the help of html div tag. As we used three div tag id’s. #button, #sing-up, and #body-color and we applied all CSS styles on them and now you can see the Figure 2, how much it’s looking beautiful and attractive. You can use many other CSS styles as like 2D and 3D CSS styles on it. It will look more beautiful than its looking now.
After these all simple works we are now going to create a database and a table to store all data in the database of new users. Before we go to create a table we should know that what we require from the user. As we designed the form we will create the table according to the registration form which you can see it on Figure 1 & 2.
Listing 3: Query for table in MySQL
CREATE TABLE WebsiteUsers
(
userID int(9) NOT NULL auto_increment,
fullname VARCHAR(50) NOT NULL,
userName VARCHAR(40) NOT NULL,
email VARCHAR(40) NOT NULL,
pass VARCHAR(40) NOT NULL,
PRIMARY KEY(userID)
);
Description of Listing 3:
One thing you should know that if you don’t have MySQL facility to use this query, so should follow my previous article about Xampp server. from this link you will able to understand the installation and requirements. And how we can use it.
In the listing 3 query we used all those things which we need for the registration form. As there is Email, Full name, password, and user name variables. These variable will store data of the user, which he/she will input in the registration form in Figure 2 for the sing-up.
After these all works we are going to work with PHP programming which is a server side programming language. That’s why need to create a connection with the database.
Listing 4: Database connection
<?php
define('DB_HOST', 'localhost');
define('DB_NAME', 'practice');
define('DB_USER','root');
define('DB_PASSWORD','');

$con=mysql_connect(DB_HOST,DB_USER,DB_PASSWORD) or die("Failed to connect to MySQL: " . mysql_error());
$db=mysql_select_db(DB_NAME,$con) or die("Failed to connect to MySQL: " . mysql_error());
?>
Description of Listing 4:
We created a connection between the database and our webpages. But if you don’t know is it working or not so you use one thing more in the last check listing 5 for it.
Listing 5: checking the connection of database connectivity
<?php
define('DB_HOST', 'localhost');
define('DB_NAME', 'practice');
define('DB_USER','root');
define('DB_PASSWORD','');

$con=mysql_connect(DB_HOST,DB_USER,DB_PASSWORD) or die("Failed to connect to MySQL: " . mysql_error());
$db=mysql_select_db(DB_NAME,$con) or die("Failed to connect to MySQL: " . mysql_error());
if (mysqli_connect_errno($con))
  {
  echo "Failed to connect to MySQL: " . mysqli_connect_error();
  }
else
{
echo “Successfully connected to your database…”;
}
?>
Description Listing 5:
In the Listing 5 I just tried to show you that you can check and confirm the connection between the database and PHP. And one thing more we will not use Listing 5 code in our sing-up webpage. Because it’s just to make you understand how you can check the MySQL connection.
Now we will write a PHP programming application to first check the availability of user and then store the user if he/she is a new user on the webpage.
Listing 6: connectivity-sign-up.php
<?php

define('DB_HOST', 'localhost');
define('DB_NAME', 'practice');
define('DB_USER','root');
define('DB_PASSWORD','');

$con=mysql_connect(DB_HOST,DB_USER,DB_PASSWORD) or die("Failed to connect to MySQL: " . mysql_error());
$db=mysql_select_db(DB_NAME,$con) or die("Failed to connect to MySQL: " . mysql_error());


function NewUser()
{
	$fullname = $_POST['name'];
	$userName = $_POST['user'];
	$email = $_POST['email'];
	$password =  $_POST['pass'];
	$query = "INSERT INTO websiteusers (fullname,userName,email,pass) VALUES ('$fullname','$userName','$email','$password')";
	$data = mysql_query ($query)or die(mysql_error());
	if($data)
	{
	echo "YOUR REGISTRATION IS COMPLETED...";
	}
}

function SignUp()
{
if(!empty($_POST['user']))   //checking the 'user' name which is from Sign-Up.html, is it empty or have some text
{
	$query = mysql_query("SELECT * FROM websiteusers WHERE userName = '$_POST[user]' AND pass = '$_POST[pass]'") or die(mysql_error());

	if(!$row = mysql_fetch_array($query) or die(mysql_error()))
	{
		newuser();
	}
	else
	{
		echo "SORRY...YOU ARE ALREADY REGISTERED USER...";
	}
}
}
if(isset($_POST['submit']))
{
	SignUp();
}
?>
Description of connectivity-sign-up.php
In this PHP application I used simplest way to create a sign up application for the webpages. As you can see first we create a connection like listing 4. And then we used two functions the first function is SignUP() which is being called by the if statement from the last of the application, where its first confirming the pressing of sign up button. If it is pressed then it will call the SingUp function and this function will use a query of SELECT to fetch the data and compare them with userName and email which is currently entered from the user. If the userName and email is already present in the database so it will say sorry you are already registered
If the user is new as its currently userName and email ID is not present in the database so the If statement will call the NewUser() where it will store the all information of the new user. And the user will become a part of the webpage.
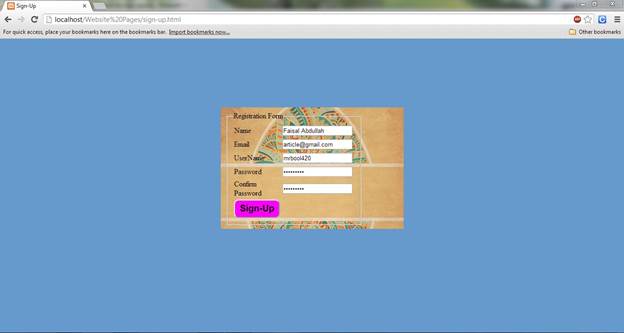
Figure 3: Entering data to the registration form, to sign-up as a new user
In the figure 3, user is entering data to sign up if the user is an old user of this webpage according to the database records. So the webpage will show a message the user is registered already if the user is new so the webpage will show a message the user’s registration is completed.
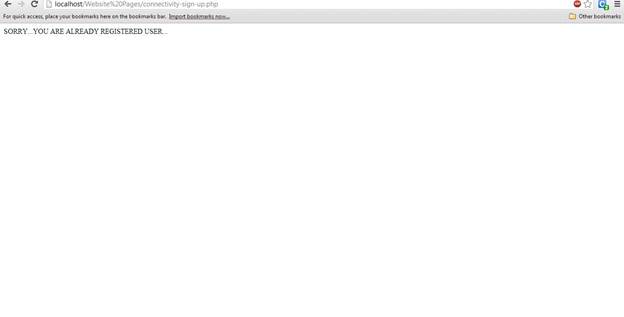
Figure 4: show the already registered user
As we entered data to the registration form (Figure 4), according to the database which userName and email we entered to the registration form for sing-up it’s already present in the database. So we should try a new userName and email address to sign-up with a new ID and Password.
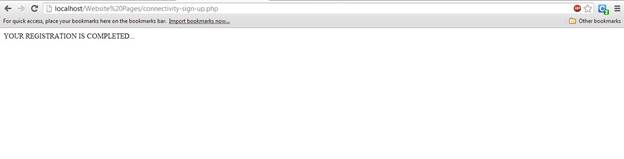
Figure 5: show the completion of new registration
In figure 5, it is confirming us that which userName and email id user has entered. Both are not present in the database records. So now a new ID and Password is created and the user is able to use his new ID and Password to get login next time.
Read more: http://mrbool.com/how-to-create-a-sign-up-form-registration-with-php-and-mysql/28675#ixzz47rzwTksF